Tuesday, 7 July 2015

Works in Progress (WIP) - Week 3

I'm really over due on my WIP, but with the start of summer break and all of the hand dyeing I've been doing recently, I've been a little negligent to both the blog and my knitting projects.

But here goes:

Current Project #1: The 7 Year Sweater
Although I haven't picked up the sweater in about a month, I'm now at the point where I'm ready to section off the stitches for the arms.  But somewhere along the way, I've missed a stitch.  1 stitch out of over 300 to account for.  I've put things aside until I want to sit down and sort out if the stitch was dropped or just never added in the first place.  My husband has waited over 7 years for this sweater, so what's a few more months?  I am pleased, however, with the stripes I'm adding in lieu of the snowflake pattern in the original design.

Current Project #2: Hand Dyed Socks

This one is really a half-finished object.  And considering I've already worn it to bed one cool night to keep my tootsies warm, I'd hardly call it a work in progress.  But I have cast on the second sock using Knitty's Solidago Sock pattern, so that is a start.   The Briggs and Little Sport wool knitted up quite nicely, although I am concerned that the single ply may not last through normal wear and tear.  I'll keep these as bed socks when done.
Current Project #3: New Wrap

 As it's summer, I'm now spending 4 nights a week at the soccer pitch to watch my boys play or practice and I needed something fairly simple to knit up, without referencing a pattern.  I've already started and frogged 2 projects  with this wool, but I'm excited to be designing a wrap with it that will show off the lovely colour variations from the dyeing process.  I can't wait to finish this piece and share the pattern.


Current Project #4: Rainy Day Shawl

Finally, I've been working with some of my handspun incorporating it into the Sunday Sunrise Shawl.  My colours aren't as cheery as the original, hence the name for the project.  The blue is a gorgeous silk-merino blend by Louet plied with a Noro lace-weight yarn.  The multi-coloured is a combination of a rainbow coloured merino and grey faulkland roving.  I've been itching to combine the 2 skeins for quite a while, but until recently, had not found an appropriate project.  I'll follow the pattern, but if I have a lot of yarn left over, I'll add a more decorative  edge. I'm most excited about this one!

Friday, 3 July 2015

Umm... What happened to June?

They say that time flies when you're having fun, but it seems to soar when you've got 2 kids in soccer and it's the last month of June!

I had a look at my blog the other night to discover that I haven't made an update since May 20th.  So much for staying on top of things.  At least I've been busy, not only wrapping up the school year and my busy volunteer schedule there, and spending 4 nights a week toting the boys to and from the soccer pitch for practices and games, but also with some knitting, spinning, and plenty of dye experimentation.

Now, unfortunately, I haven't completely documented the dyeing process as much as I had initially planned (I got WAY too excited about doing it), but I do have a few records here and there of my efforts.

In early June I thought I'd haul out my giant pickle jar and attempt to dye some wool with coffee beans in the sun. The heat from the sun is supposed to release the colour from the beans into the water to dye the yarn and the tannin in coffee is supposed to be a natural mordant.  To help things along, I made liquid portion of the project 1 part vinegar to 3.5 parts warm water.  I added about 1 1/2 cups of whole beans to my pre-soaked wool (1 skein of Briggs & Little Regal), covered the jar with a thick plastic shipping bag, and let it sit on the deck for a day in the sun.

Upon inspection on day 2, I wasn't happy with how the colour was saturating the wool (see above photo), so I brewed a pot of strong coffee, let it cool, and added that to the jar.  The wool didn't seem to pick up too much more of the colour, but after a few more days on the deck, I steamed it in the microwave as I do to set my food colouring dyes, rinsed it, cleaned it and I'm pretty happy with the final result.  It's not as dark as I had anticipated, but it's a lovely cafĂ© au lait colour.


I'll try this again, but next time I'll do it on the stove top and go straight to the brewed coffee.  I've read that a pot of coffee run through the machine twice will yield an extra strong result, and, I hope, it will also yield an extra strong dye.


Wednesday, 20 May 2015

Weekly WIP - Week 2

Okay.  I'll admit it. It's all a lie.  I can hardly call this a weekly WIP as I've missed 2 weeks, but it makes a great title.

I've been so busy the last 2 weeks volunteering at my boys' school, getting the garden ready and hand-dyeing that I haven't been keeping up with my knitting.  I've also crocheted a bunch of little flowers (left) and made some costume jewellery.  I've accomplished a fair bit, but my knitting projects are pretty much where they were 2 weeks ago.


I did, however, cast on a pair of socks last night using my recently dyed Briggs and Little Sport that I dyed with food colouring.  It's a single ply wool yarn and the colour is delicious.


I'm knitting a basic top-down sock (based on the  Solidago pattern on Knitty.com) and it is knitting up quite nicely so far.  I love how the colours are already starting to pool in just the right way.  Hopefully, I'll be done at least one more for next week's WIP.

Monday, 18 May 2015

Adventures in Dyeing - Part 3

It's a gorgeous summer afternoon (for a Victoria Day) and rather than do myself in under the hot, hot sun gardening, I decided to do a little more dyeing.

I hope that this is a better documentation than  in Adventures in Dyeing Part 2.  I hope to be able to eventually find the technique that works best for me.  I'm not sold on this one; I hand-painted the yarn this time using squeeze bottles and the Wilton Dyes.


1. Prep the Yarn


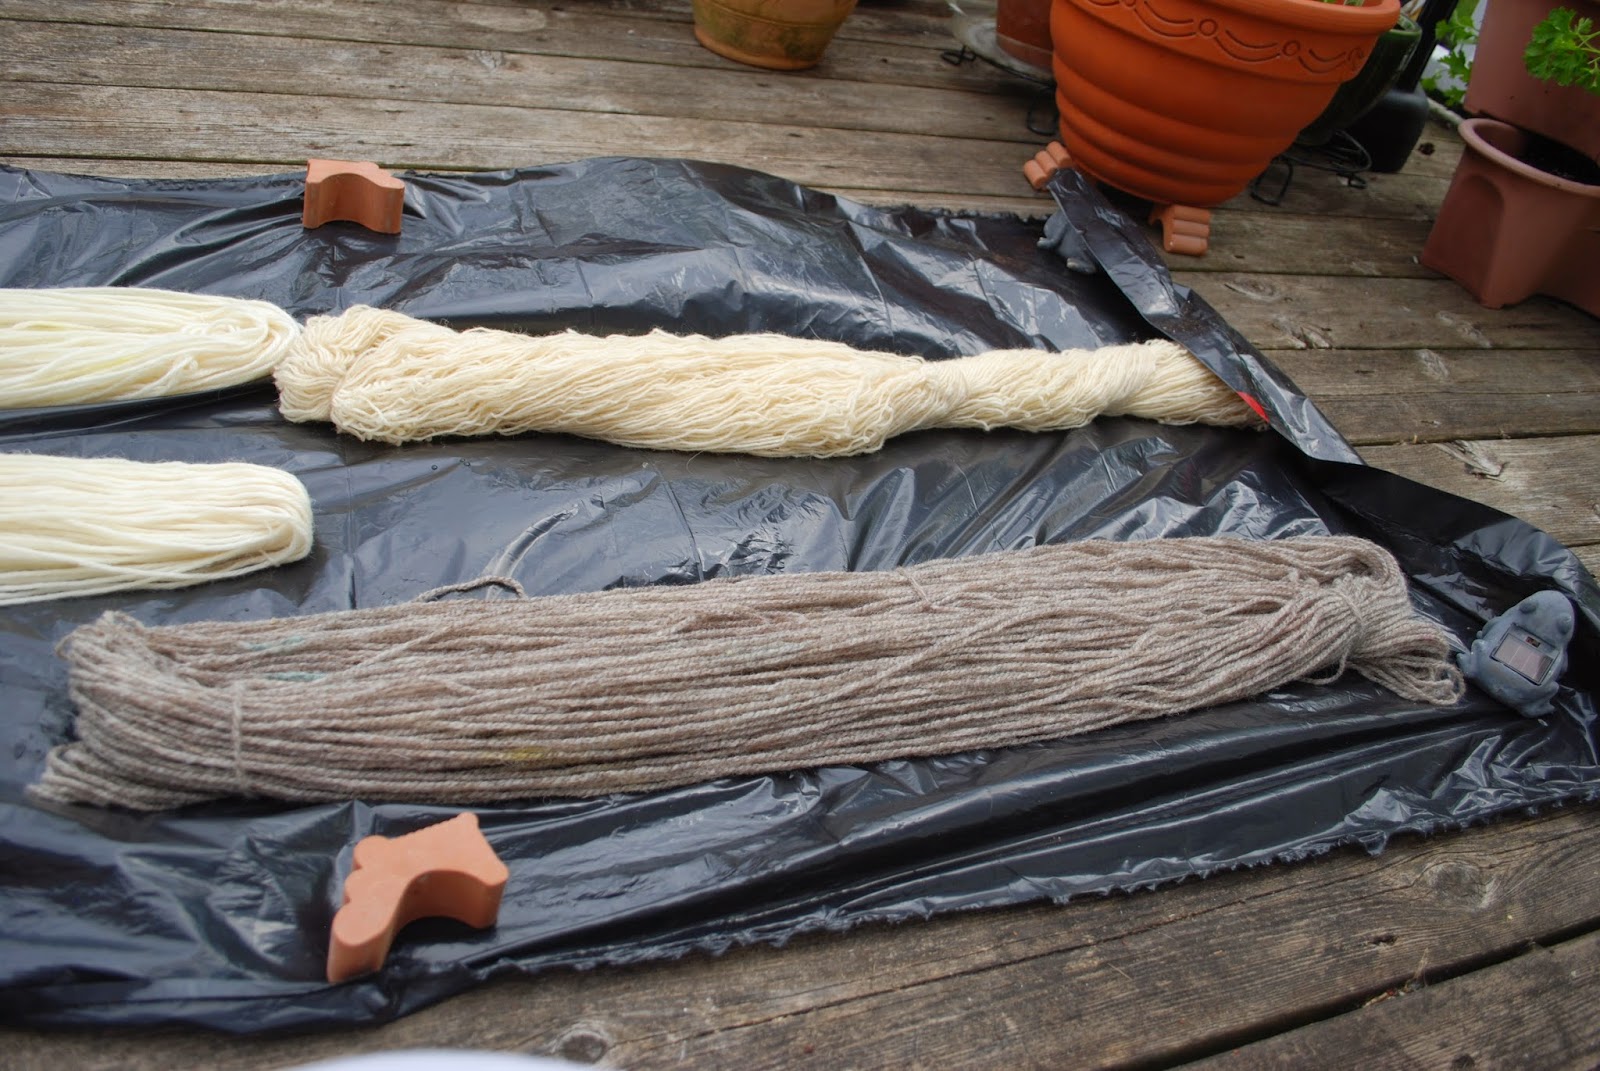
I pre-soaked (or wetted) the yarn in a solution that's 1:3 vinegar:water for an hour or so.  Then after wringing it gently, I laid it out on a plastic sheet (garbage bag). Today I used 2 skeins of Knit Picks Bare Wool Bulky (top image), a skein of Briggs & Little Sport Natural, and a skein of Briggs & Little Heritage Sheeps Grey (image below, top and bottom).


2. Prep the dyes

The great thing about using the squeeze bottles is that they are marked with measurements. The bottles take 8oz of liquid, so I filled each to 2 1/2oz vinegar, then added about 1/2tsp of the Wilton gel and stirred to start to dissolve it. (This was not 100% successful, not all of the gel dissolved in the vinegar and some still came out in globs. Next time, I'll dissolve the gel in warm water and then add the vinegar).  I then filled the bottle with water, screwed on the lid and shook to mix the dye. Note: squeeze bottles from the Dollarama don't seal too well, so dye leaked out.  I'll have to pick up a better set.

3. Paint the yarn

Using the squeeze bottles, I painted stripes on the yarn, overlapping colours where I saw fit.  


For the bulky, I painted one end with Red Red, and the other with Lemon Yellow.  I blended the 2 in the middle by overlapping the colours, but with a slightly watered down red.


The Sport (top) and Heritage (bottom) both have a combination of the Lemon Yellow, Sky Blue and Black.  The really cool thing about the Black dye is that it's not black at all.  Even as the dye hits the wool, both purple and green are evident!

4. Blend the Dye

To blend the colours into all strands of the yarn, I gently squeezed the yarn, making the painted stripes blend together, softening the effect.


5. Set the dye

I carefully lifted the skeins and gently wrung them out before placing the yarn (lightest side up) into Pyrex bowls for steaming in the microwave.  Unfortunately, I wasn't as careful as I thought and some of the green pooled on the plastic, affecting the yellow of the bulky yarn.

To steam, I microwaved each bowl of yarn on high for 2 minutes, then let them rest for 2 minutes and repeated this a total of 3 times until he water ran clear when the yarn was lifted out of the bowl.  (When you do this, don't forget to put a plate or loose fitting lid on top to trap the steam, while still letting some escape.)


6. Finish the yarn

Once the colour is set, I let the skeins cool down on the deck in their bowls. To finish things off, I rinsed the yarn under lukewarm water and then soaked it for about 10 minutes in Soak.  A quick wringing and spin in the salad spinner and it was ready to hang to dry on the deck.


I'm pretty pleased with how the yellow/blue/black dye combos worked out.  I expected to get a purple and green result from the black dye, but didn't expect that the blue would disappear into it and the yellow to result in so much green.  


As for the red/yellow, I expected a little more red or orange from the dye and a lot less pink.  The blend between the 2 colours was mostly successful, but I'm not keen on the orangey-pink colour in the final product.  I think I will either over dye the whole thing in yellow or a different shade of red. The fun is in the experimentation and the unexpected results.  The accidental pooling of green that crept onto the yellow/red actually had a nice result, adding a little more interest to the boring old orangey-pink!


Thursday, 14 May 2015

Adventures in Dyeing Part 2


The sun is shining, the birds are singing and after a few miserable weather days, Spring is back!

Today, I thought would be the perfect day for some dyeing; this time with Wilton Food Colouring gel and more of the Knit Picks Bare Wool (this time in fingerling weight). I also tossed in some Wool-Ease, just to see how it would take the dye with only 10% wool.

Unfortunately, I didn't document the process (photos and measurements) as much as I did with the turmeric dye a few weeks ago, but I've made good progress today and I at least have something to show for my efforts.

I first tried dyeing with Wilton a few summers ago when I was dyeing with Kool-Aid.  I had more yarn than drink crystals, so I dyed my last 2 hanks with some  Delphinium Wilton colouring and a little vinegar as the acid to set the colour.  The result was surprisingly good.  I had honestly not expected to see a decent result as I hadn't done any research on using food colouring to dye yet. I actually preferred the final product to the It's amazing how sometimes the offshoot of your main project can wield better results!


Fast forward 2 years, a bit more research, and a lot more ambition.

As intriguing the concept of using Kool-Aid as a dye is, it has it's limitations (and for me, I'll be honest, a wee bit of a gross out factor).  I've read a number of blog entries and articles that I've found via Pinterest (here's my Handspun and Dyed board) and I've poured through my copy of Gail Callahan's Hand Dyeing Yarn and Fleece many times to understand the fundamentals of dyeing yarn (so I guess I won't be using the leftover tie-dye kit dyes on wool after all).  I believe that I have a grasp of what I need to do, now the fun part will be to see if it fits with what I want to do!

And here is what I wanted to do: create 2 hanks of yarn with yellow blending into blue.  The yellow and sky blue are a lovely complement to one another.

After "wetting" the yarn  in a water/diluted vinegar bath, I laid the hanks out side by side on a plastic garbage bag.  I mixed about 1/2tsp of the yellow colouring gel into about 1 1/2C water and 1/2C vinegar and did the same with about 1/4tsp of blue.  I poured the yellow slowly over the top third of the hanks, gently squeezing as I went to saturate the fibres. I then did the same thing with the ble at the opposite end of the hanks.  I then gently squeezed the hanks from the outside in to blend the blue and yellow together in the centre as green.  I did the same with the left over dyes to my experimental sample of the Wool-Ease sportweight (as you can see below).

Following the formula of 2 minutes on, 2 minutes off repeated, I steamed the yarn in the microwave (yay for food safe colouring!)  And now I'm just waiting for the yarn to cool down to room temperature so that I don't shock it when I rinse it.  So far I'm pretty happy with the results.  The dye bath has run clear and the colours are gorgeous.


This project seemed like a cake walk compared to the turmeric/beet dye.  I can't wait to try another technique soon.  I'm thinking dip dyeing.  Stay tuned....

... And here is the result:  after a rinse and wash with Soak, it's so beautiful.


Sunday, 10 May 2015

Ruminations on Mother's Day - A Non-knitting post.

Here in North America, today is Mother's Day.  It's not a day I look forward to.  At least not in recent history.

This is my second Mother's Day without my own Mum in my life.  A day when I feel sad, lonely, empty inside, and, more than any of all this, guilty.  Guilty for not being the daughter I should have been.  For taking for granted her unconditional love and forgiveness for my oh so many faults.  Today  I'm reminded of my failings as a daughter and as a mother and wife, too.  I feel guilty for being envious of the husbands and children who make a big deal out of spoiling their Mums every second Sunday in May.  Jealous of those who get more than breakfast and a lie-in after a week of reminding them that the dreaded Sunday is nigh.  And the guilt of realizing that once I was a mother myself, that Mum only got a call from me on the day, followed by a gift on an upcoming visit (a product of living 5hrs away, but still...), and that is probably just as bad.

So when everyone I know is posting "Happy Mother's Day" on Facebook or showing off their fancy brunches,  or neat little trinkets, I will make no post or share today. I simply change my Profile pic to one of me and my boys hours after my second, Alec was born.  It reminds me that I'm doing a decent job with them on a daily basis and it takes the pressure off the day.

So instead of focusing on May 10th this year, I'm looking at last week as Mum Week.  I dedicate myself to volunteering at my boys' school weekly, but for 2 weeks a year, once in the Fall and again in the Spring, always the week leading up to Mother's Day, I am at the school daily, organizing and running our Book Fair.  I'm also baking and potting plants for our annual Plant and Bake Sale. To me, this is my celebration of being a Mum more so than Mother's Day; it's what being a Mum means to me.  Giving of my time to my sons' school, especially knowing that they are proud to see me there, really makes me feel like a Mum - I wouldn't be there if I wasn't.  I'll admit that I love to hear the other boys and girls call me Alec's or Philip's Mom.  It gives my life importance and meaning.  Being their Mum is who I am, not just one day a year, but on a daily basis.

As I write this, I'm looking at this special photo.  It's not posed, it's natural.  And it's beautiful.  It's the moment when my capacity for love and dedication doubled.  Doubled in ways I would have never believed possible before having a family of my own.  A mother's unconditional love.  I have it for my boys (despite their efforts to drive me crazy with their constant bickering) and I truly hope and mostly believe that my Mum had for me and my sisters (despite all of our constant bickering.)  At least that gives me some solace on this sad Sunday in May.


Note:  My Mum gave me my love of creating crafty things and knitting, in which I find great solace.  I treasure my memories of my Mum coming on field trips with me (especially to the Toronto Zoo in Grade 3) and one of my 'jobs' at the school is to help with the Knitting Club.  


Friday, 1 May 2015

FO Friday - I was in need of a quickie...

I was staring at my "needs to be sorted" stash last night and felt the need for some instant (almost) gratification.  My family's been going through a bit of a stressful period lately, and despite the good work that I'm doing with my WIPs, I really needed a quick fix of a completed project.

So I pulled out the 2 hanks of Katia Iceberg that I picked up at a warehouse sale 2 months ago and set to work on a big chunky cowl. I always find it fun to use my 'comically oversized' needles and they were the perfect fit for this project.   I improvised the pattern (the kind of knitting that I find most relaxing) and here it is (albeit in a really, really rough format)!

Kirsty's Relaxin' Chillaxin' Mobius Wrap


Yarn: Katia Iceberg (or a similar Super Bulky Yarn), 2 hanks (200g/66m)

Needles: 19mm/US35

Gauge is not important for this pattern.  Have fun with it!

Abbreviations:
Sl1K: Slip 1 stitch knitwise
YO: Yarn over
sl1 k1 psso: slip1 knitwise, knit1, pass the slipped stitch over
k2tog: knit 2 stitches together

Pattern:
Loosely cast on 16 stitches.

Row 1: sl1k, [YO, sl1 k1 psso] to last stitch, K1
Row2:  sl1k, [YO, k2tog] to last stitch, K1

Repeat these 2 rows until you've only got enough yarn left for one more row to bind off leaving a long tail.  Around about 50 rows.

Bind off loosely.

Block the piece as a flat rectangle.  Once dry, giving the  piece a single twist, sew the ends together using a mattress stitch.

That's it.  Easy-peasy lemon squeezy!